Notice: Undefined variable: post_id in /data/wordpress/htdocs/wp-content/plugins/pressapps-knowledge-base/public/partials/page/page-single.php on line 41
Setting up a Moodle course
Article sections
Moodle course area and participant administration is done in Peppi.
This applies to all applications found in Peppi.
Make sure you have defined teacher information to the application in Peppi according to Koulutussuunnittelu -> Suunnittelijan ohje toteutuksen tekemiseksi .
A. If application does not yet have a Moodle site
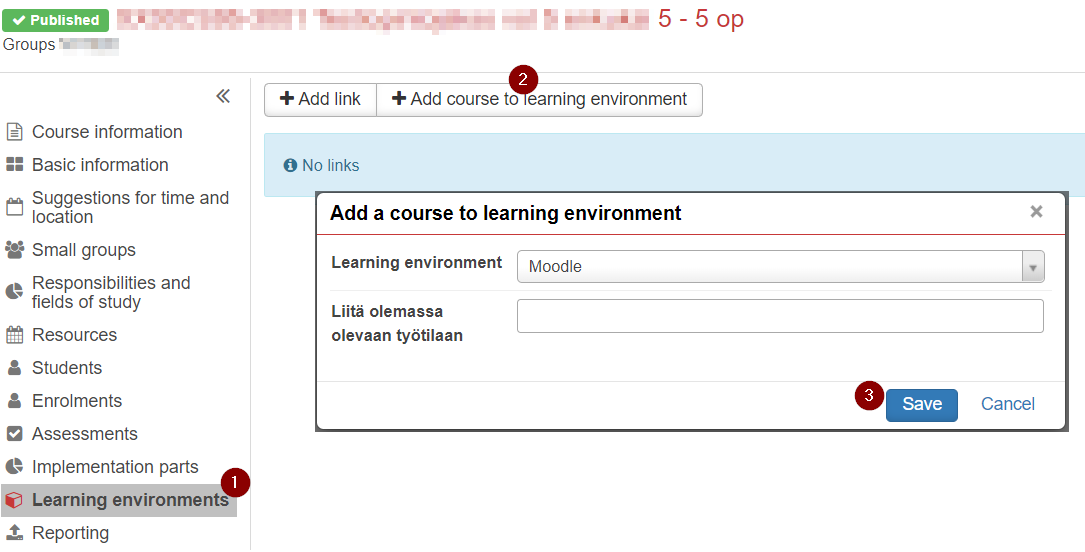
In the Peppi implementation plan on learning environments there is a button ”Add course to learning environment”, where you can add a new empty Moodle course for the implementation in question.

Steps:
- Click + add course area to the learning environment.
- A window opens, DO NOT WRITE ANYTHING.
- Click save button. Moodle site is formed in few seconds.
If you receive the following error message, contact Servicedesk.

The Moodle course consists of:
- Course full name = Name and ID of the module / application
- Course short name= ID of the module / application
- Course visibility = Hide (Teacher unhides once course is ready to be revealed)
- The person responsible, teachers and students accepted to the application are linked automatically to the site. If student’s registration is canceled or rejected, the student will be withdrawn the Moodle site.
- Copying the Moodle site contents is done is Moodle according to – the instructions.
B. Combining a previously ordered Moodle site with an implementation in Peppi or combining multiple implementations into the same site
If you want to combine the activities of two or more implementations and their people in the same site, first create a Moodle site for one implementation using the instructions in section A, and for other implementations, combine as follows:
- Click in Peppi from the implementation plan in question learning environments – > Add Course Area to Learning Environment button.
- From the settings of the existing Moodle site, copy the Course Abbreviation and paste it in Peppi in the Paste to ready Moodle course. This creates a link between the implementation in Peppi and the Moodle site. In this case, the participants are managed in Peppi and the participant information is automatically updated to the Moodle course area.
B1 Changing the implementation in the old Moodle to the site learn.hamk.fi environment or recombining the new Moodle site
- Unlink the site in Peppi from the implementation data.
- If a site has not yet been ordered for the learn.hamk.fi environment, proceed as follows after the deletion: After the deletion, press the “Add course area to the learning environment” button, and continue as described in section A.
- If you already have a site in the new Moodle, and you want to associate it with the implementation, after deleting, do the following: Copy the Course Abbreviation from the settings of the existing Moodle site and paste it to Peppi in the Append to Moodle field.

C. If implementation is not yet found in Peppi
If you haven’t done so yet, order a site in Moodle via the Order Course Area button in the Info menu in the top bar. Once the implementation is done in Peppi, follow the instructions in section B.
D. Problems in getting all accepted students from Peppi implementation to Moodle course?
In Peppi, open the implementation data editing mode. Press the Save button. The virtual data update also updates the participants’ data in Moodle.
If students still are not enrolled, unlink the course from the implementation n Peppi and add it again, use Moodle course short name for the existing course (follow the instructions in section B1).
Do not use special characters in Short Names. (See the Basic site Setup Guide to abbreviate the site) .
Some implementations of in-service training
Some of the continuing education implementations are managed in the ASIO system. In this case, the Moodle course areas will also be created in ASIO.
Other Moodle course areas
In case you need a Moodle course area for an implementation other than in Peppi or Asio, order the course area in Moodle -> Info -> Order course. You will receive an email informing you that your order has been accepted. The subscriber is connected to the Moodle course area created as a teacher.
- To add participants to the course area, a course key must be created. Instructions for adding a key .
- Participants in these other, hand-created Moodle course areas are managed entirely in Moodle.
- NB! Other course areas may no longer be used for credit-generating activities.
Notice: Undefined variable: output in /data/wordpress/htdocs/wp-content/plugins/pressapps-knowledge-base/public/partials/page/page-single.php on line 83
